PrimeOne Series- RK3568
The PrimeOne devices are Google certified and therefore support the Google Device Managemnet from the StartWizard. For integrators, there is also an uncertified open and rooted firmware. The current firmware version has an OTA update function. If an update is available, it can be downloaded under Settings/System/Update.
List of article numbers
New update available! Security Patch 2025 installed
- 10 inch - 215110 - Download Link Firmware
- 12 inch - 219234 - Download Link Firmware
- 14 inch - 218414 - Download Link Firmware
- 15 inch - 219236 - Download Link Firmware
- 18 inch - 219232 - Download Link Firmware
- 21 inch - 219233 - Download Link Firmware
Link to the complete firmware directory: https://fileshare.allnet.de/s/7oUV1XNFiEsrW69
Factory Reset/Recovery mode
Use a paper clip to press the reset button next to the USB port and apply power at the same time. Hold the button for approx. 4-5 seconds until the recovery menu appears. Select the desired item by pressing the reset button. Confirm the selection by pressing the power button.
Linux Firmware
10 inch Debian 11: Download
12/14/15 inch Debian 11: Download
18/21 inch Debian 11: Download
Instructions Firmware update:
Firmware update instructions: Download
ADB driver program DriverAssistant_v5.12: Download
Flash Software RKDevTool 3.13: Download
Step by step instructions: Download the Driver Assistant and the RKDev Tools from our fileshare. Both must then be unpacked.
- install the "Release_DriverAssitant". After installation, the display is recognized by the PC. If ADB drivers are already installed on the device, the tablet may not be recognized. Please uninstall these ADB drivers beforehand and download the Driver Assistant and RKDev Tools from our file share. Both must then be unpacked. 2. start the RKDev tool
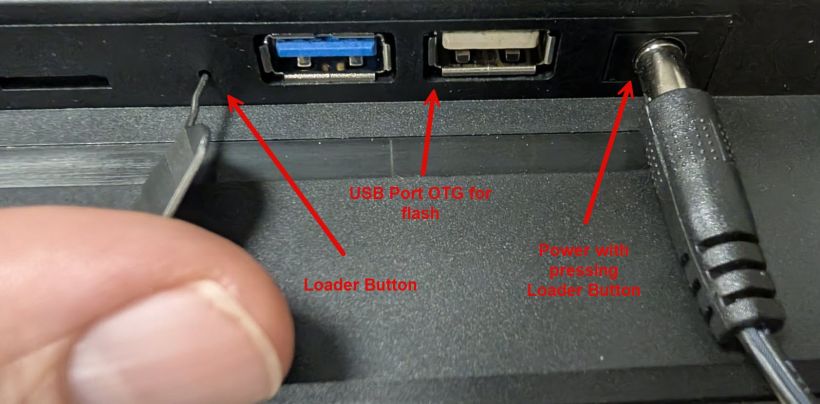
- first connect the blue outer USB-A port next to the power socket to the PC.

The loader mode must now be started for flashing
There are several ways to enter loader mode.
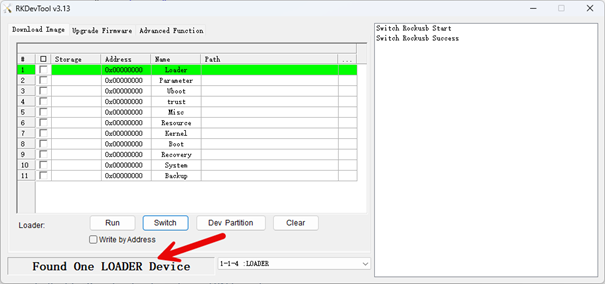
First way: With the 10 and 12 inch displays, it is very easy to start the loader mode by pressing the VOL+ button and the power button simultaneously. To do this, press both buttons simultaneously, apply power and hold for approx. 3-5 seconds. The RKDevTool must be started beforehand. The loader device should then appear here.
Second way: which works with all Rockchip mainboards.
A paper clip or a reset pin is required. To do this, the button with the paper clip must be pressed and the power supply cable plugged in. This small hole is normally always located on the mainboard side, even on other devices.
Third way: When the device boots normally
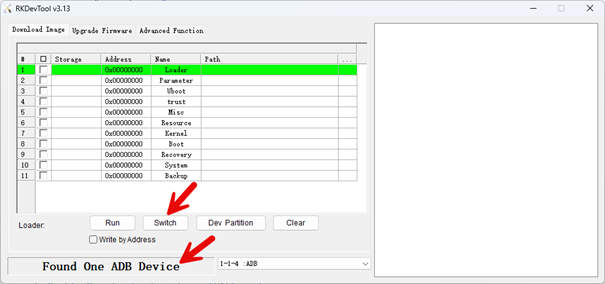
If the tablet boots and an ADB device is detected, the Switch button must be pressed in the RkDevTool. The tablet then restarts in loader mode and the display remains off or in the boot screen.
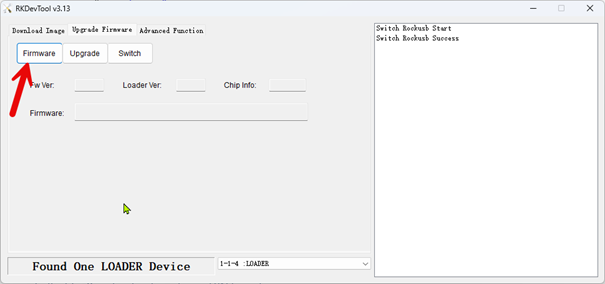
Select firmware and flash
To do this, click on the Upgrade Firmware tab and then on the Firmware button. Select the firmware.
The firmware must not have OTA in the name and must be unpacked. The file is an *.img file.
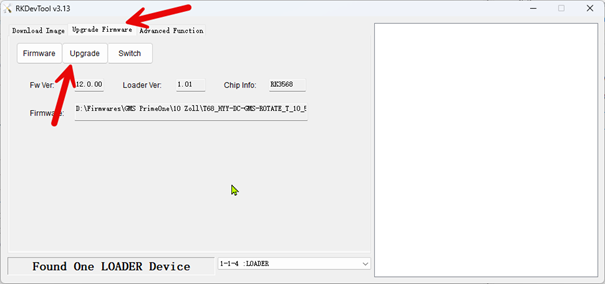
Once the firmware has been selected, simply click on Upgrade. The download progress is displayed on the right-hand side. After successful installation, the device will restart.
Important! To perform a complete clean installation, e.g. when switching from Android to Linux and vice versa, the Erase All button must be pressed under the "Advanced Functions" tab. The device then starts as a Maskrom device. The same applies if the Android version is changed. E.g. from Android 11 to Android 13.